


Note: This post contains affiliate links for a product I have been testing and am very excited about! I’m thrilled to be able to share it with you.

Are you promoting product pins on Pinterest? Want a clearer idea of the ROI on your Promoted Pin budget? Are you enjoying the options for targeting and tracking, but haven’t been able to figure out how to target and track by event conversions? Not sure what I’m talking about? 😉
Well, Pinterest’s new conversion pixel lets e-commerce marketers track events that happen on their site as a result of a Promoted Pin click. AND, it lets us create audiences based on the actions people take on our site – regardless of how they get there. Perfect for retargeting pinners with Promoted Pins! The actions include:
- PageVisit
- ViewCategory
- Search
- AddToCart
- Checkout
- WatchVideo
- Signup
- Lead
- Custom
You can further narrow down your audiences by looking at specific values for these actions. For example:
- product_id (create an audience of people who added a specific product to cart, for example)
- value (create an audience of people whose purchase totaled $200 or more, for example)
See all your options in this .pdf starting on page 5. UPDATE: Pinterest support tells us that despite what it says on page 5, you can’t actually create audiences based on product_id, etc. This document should be updated soon (check here for a new version). Sigh… Keep reading though – we have a workaround!
Most usefully, Pinterest conversion tracking will also allow us to tell exactly how much money our Promoted Pins are sending our way. Hooray!
Why Pinterest Promoted Pin Advanced Audience Targeting Matters
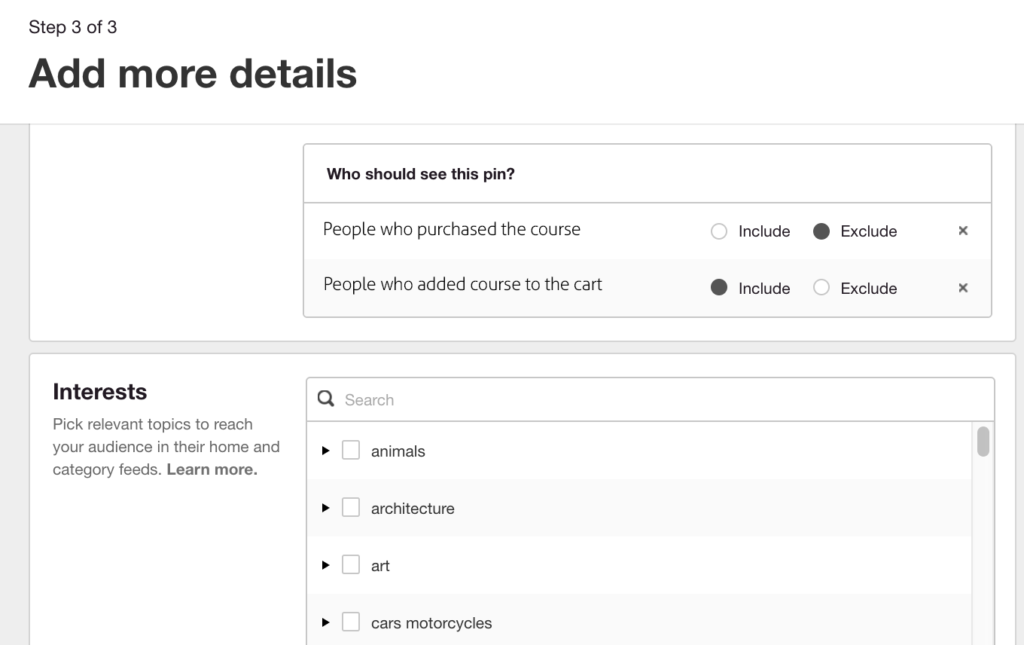
Why would you want to target pinners based on these actions? Well, let’s say you have 20,000 people add your etched crystal vase to their cart, but 12K of them never complete the sale. Wouldn’t you like to retarget those 12K people who were interested but didn’t follow through? Using event tracking and audience creation – you can! You’ll just include the audience of those who added the item to the cart and exclude those who checked out with that item in the cart! I’ll show you how in a minute.
While you can finagle a tracking system for many of these events using these workarounds, or you can hire a programmer to set up the javascript on each page and product, there is (finally) a much easier way!
Why Promoted Pin ROI Matters
File this under “things Captain Obvious says.” If you’re going to keep spending money on Promoted Pins, you want to know if it’s working, and how well it’s working – to the dollar. Conversion tracking will enable you to do that!
Introducing Pinoculars!
When I wrote the article about event tracking, I hired a programmer, Alex, to help me figure it out and how to use it on my site. We ended up deciding it was more than I need on my site and that the more advanced tracking was really only valuable for e-commerce sellers. But at least I understood it!
I referred Alex to my friend and fabulous Pinterest Rock Star, Jessica, and he worked with her, too. Sensing a real need for an easier solution, Alex developed Pinoculars (affiliate link). He says,
“I built Pinoculars when I saw how frustratingly complicated Pinterest event tracking can be. Conversion tracking shouldn’t be this much work. I wanted to take the headache out of event tracking so everyone can access detailed tracking and audience creation without needing to be a big corporation.”
If you’re using Shopify or WordPress with WooCommerce or Easy Digital Downloads (Shopify integration is complete and available, use discount code alisa for two extra free weeks), Pinoculars is about to open up advanced targeting and conversion tracking with no programmer needed. Sorry, Alex – you coded yourself out of a job! 🙂
Install Pinoculars Today If You Want to Use it Tomorrow
Pinoculars, or your custom Javascript, can only collect event data after it’s installed, so do it now if you think you might want to use it some day!
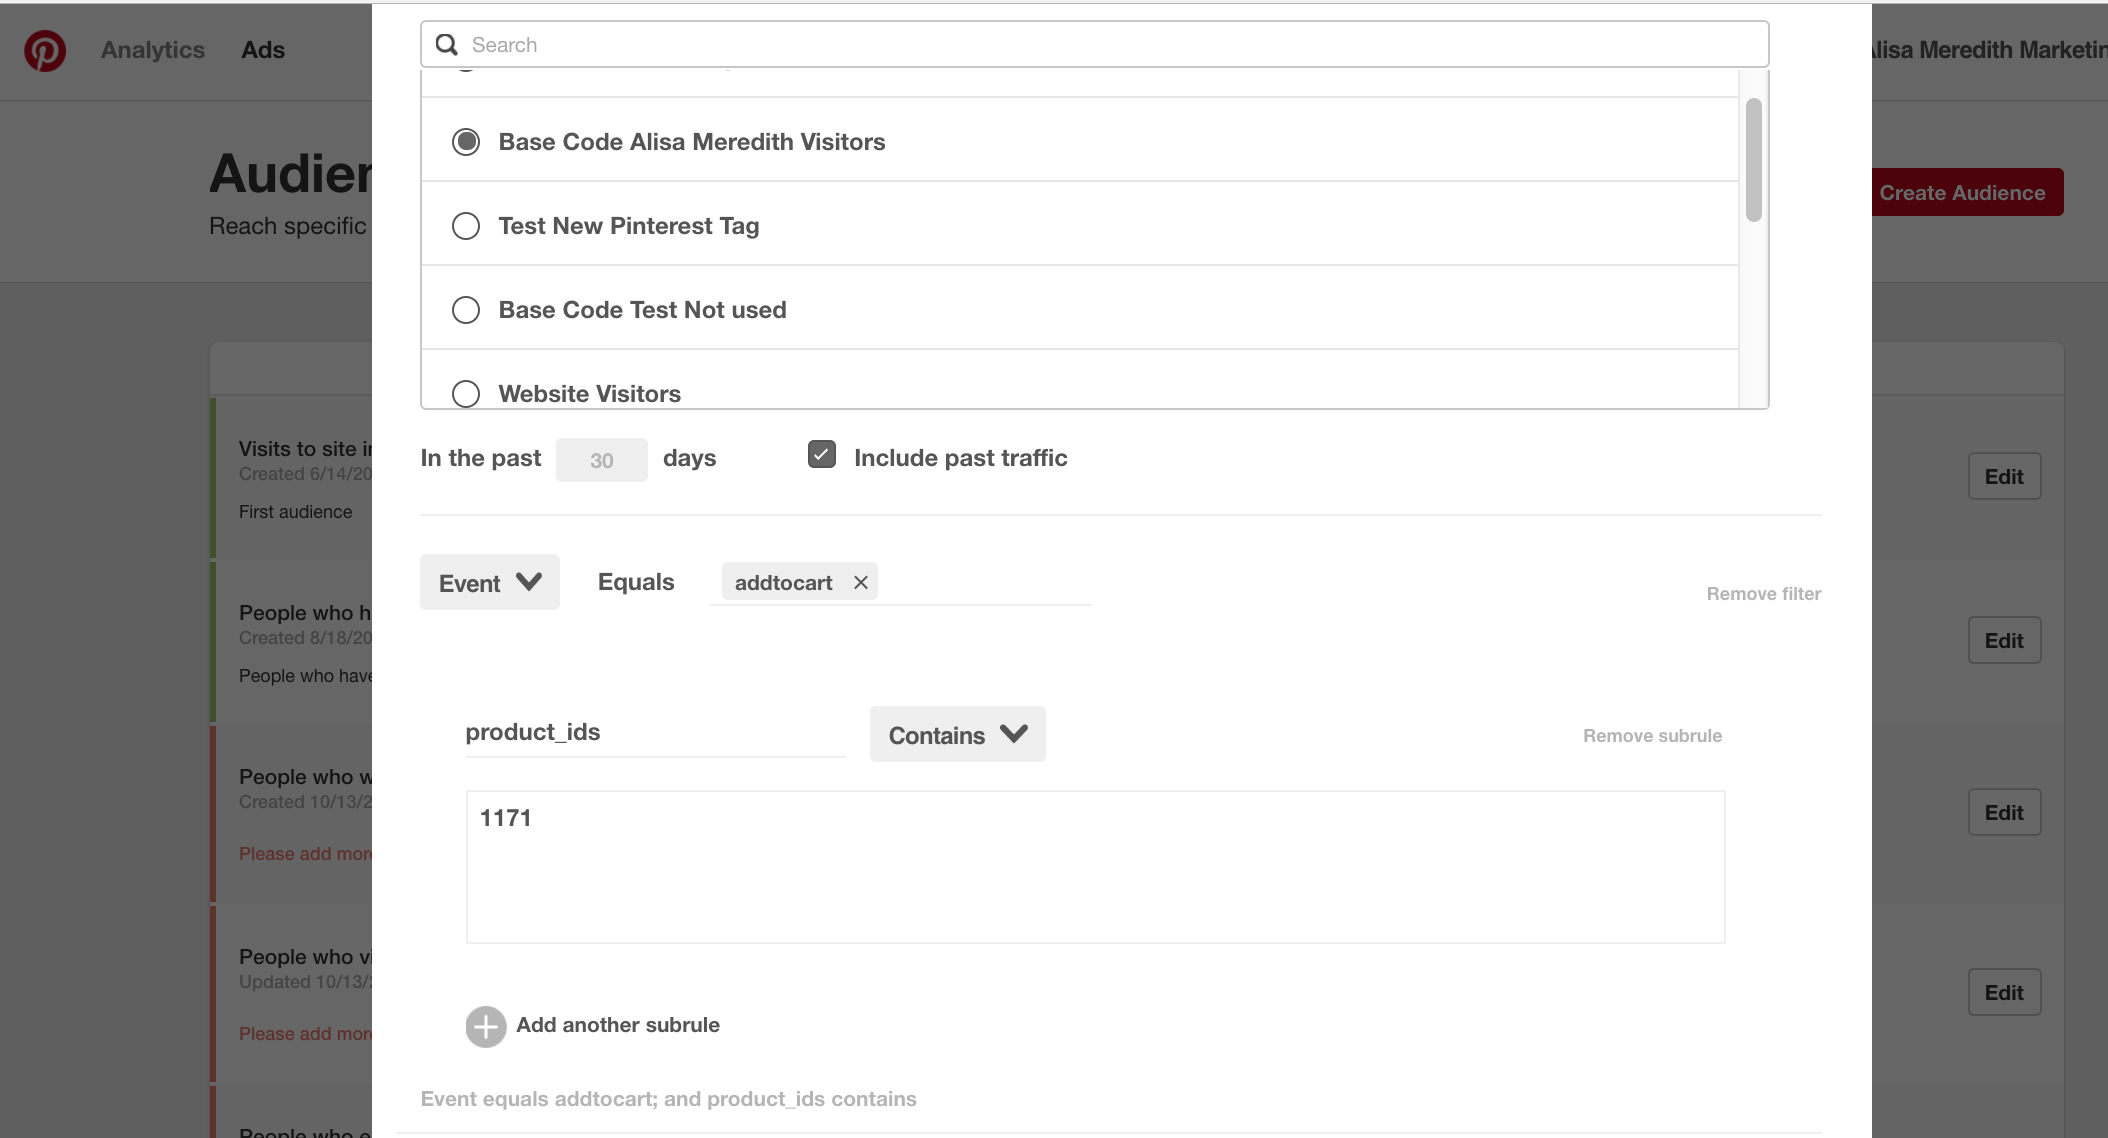
Here’s how it will look in your audience creator – when it asks for “subrule” you will give it your event data (in our case, product_ids – note that this is a custom attribute used by Pinoculars – it corresponds to product_id, see more at the very end of this article), then set the criteria of “contains” even if using only one ID. Here’s a real, tested example.:
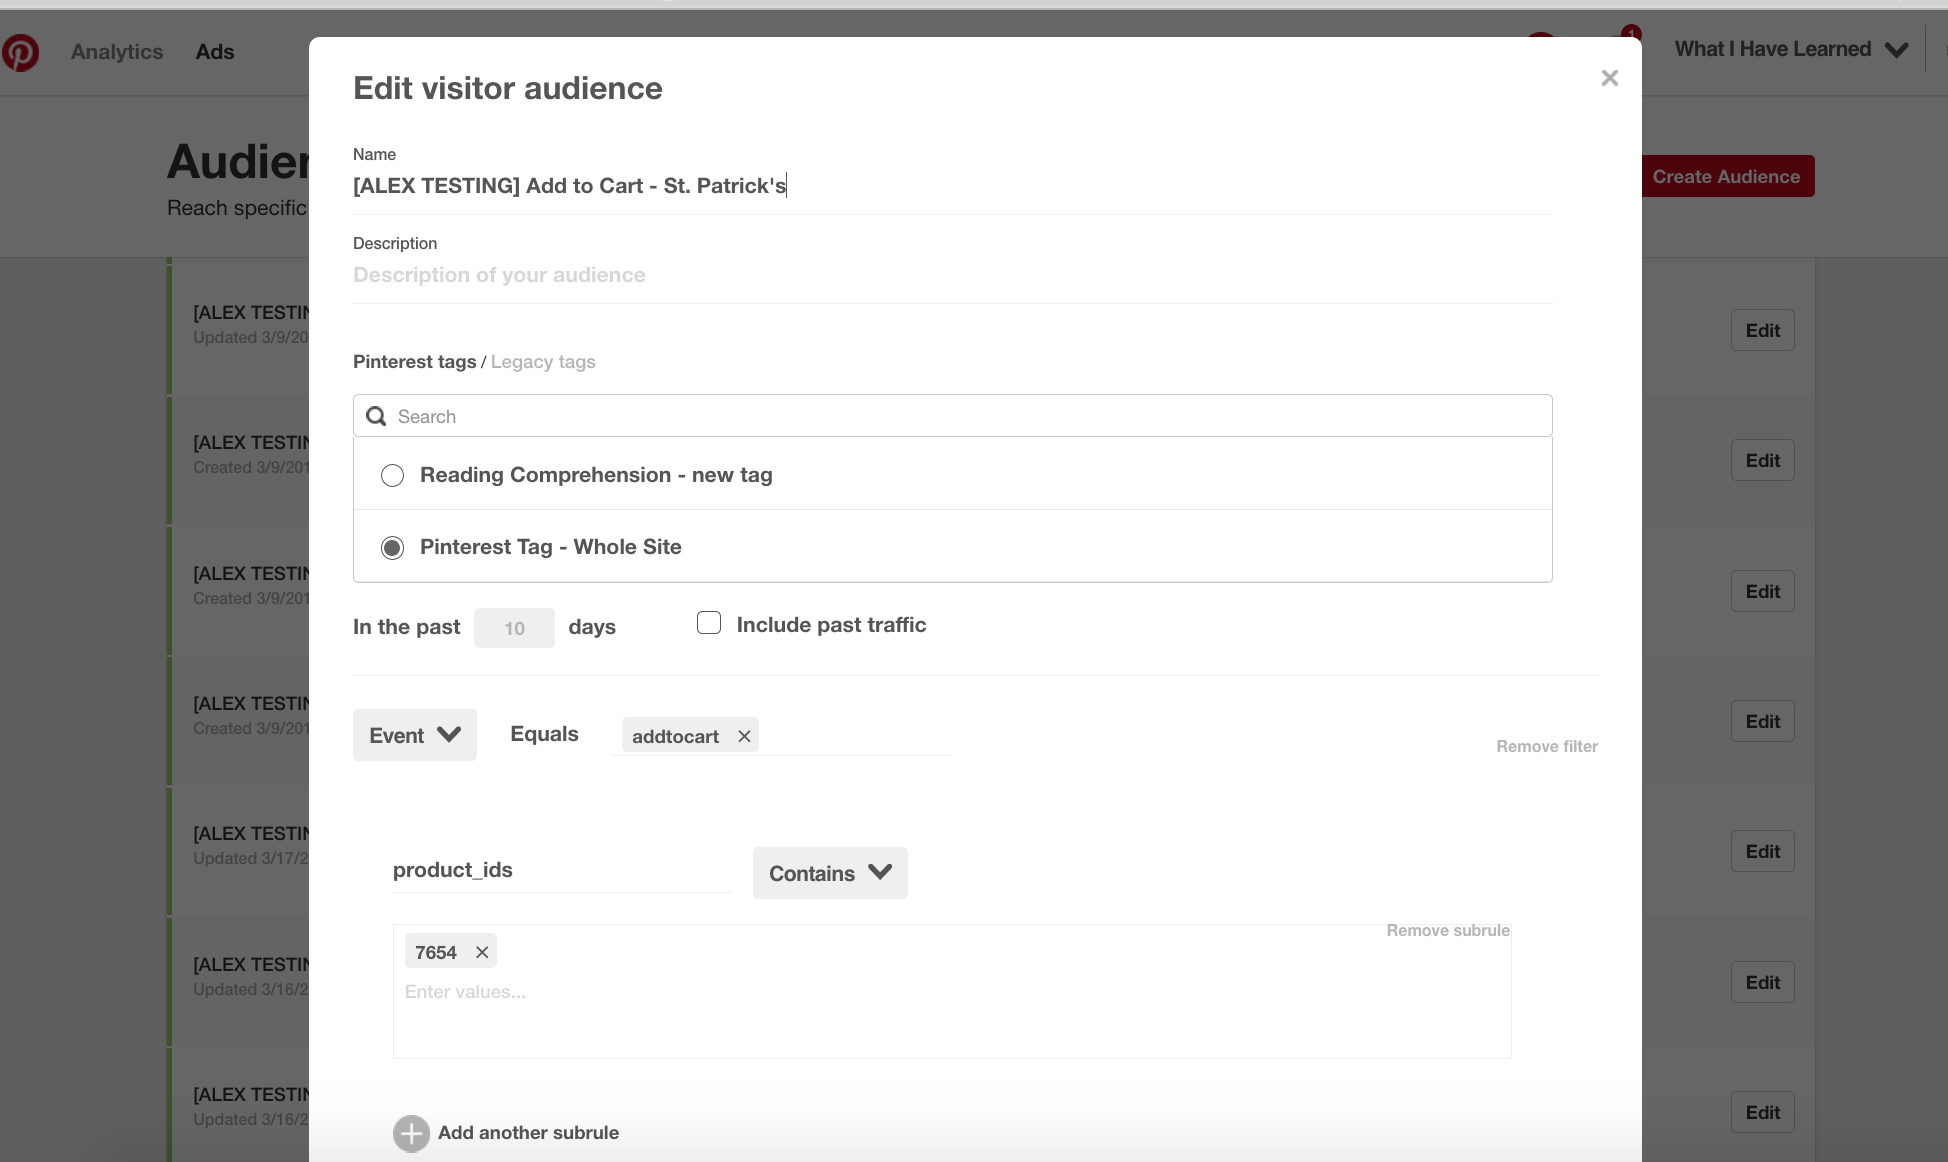

![]()

How to Set Up Pinoculars in WordPress
It takes about three minutes!
- Get your Pinoculars subscription, download, and install the plugin.
- In WordPress settings, choose Pinoculars.
- Add your license key.
- Add your Pinterest ID, which you can find from Advertising > Conversion Tracking. Open up your base code and look for the number in red.
- Choose your options (WooCommerce or Easy Digital Downloads).
Pinoculars code replaces the base code conversion tag, so if you have already added the conversion tracking code, remove it!
If you want to track leads, make sure you check the “Track Lead” box on every thank you page on your site (you’ll see it). You can use it with UTM codes if you want, or you can let Pinoculars try to find the referral source.
How to Set Up Pinoculars with Shopify
Step 1: Install & Approve
- Check out the site, get the add-in in the app store, and select the big green ‘Get’ button.
- Select the blue ‘Install app button’ to proceed to the order summary.
- Select ‘Confirm My Plan’ and then verify the charges with Shopify when prompted.
Step 2: Add Your Pinterest Tag ID
- Select the Pinoculars app from the Apps page.
- Input your Pinterest Tag ID in the labeled field and select “Save all Options”. If you’re not sure where to get your Pinterest Tag ID, follow this guide on finding your ID.
Step 3: Choose Your Settings
- If you’re not on the Pinoculars Settings page, find it by selecting the Pinoculars app from the Apps page.
- Select what you’d like to track by checking the checkboxes and selecting “Save all Changes”. PageView tracking is enabled by default and can not be disabled. For a description of each option, please check out this article we wrote. Note: I suggest enabling all – you never know when you might want to use it!
Pinoculars code replaces the base code conversion tag, so if you have already added the conversion tracking code, remove it!
That’s it! Your Shopify site now has Pinterest conversion tracking and you can create audiences based on specific actions with product IDs, dollar amounts, etc! AND you’ll be able to tell how many dollars in sales come through because of your Promoted Pins.
An Effective Example of Conversion Tracking in Action


Using Event Tracking to Create a New Audience


Finding Your Pinterest Promoted Pin Sales

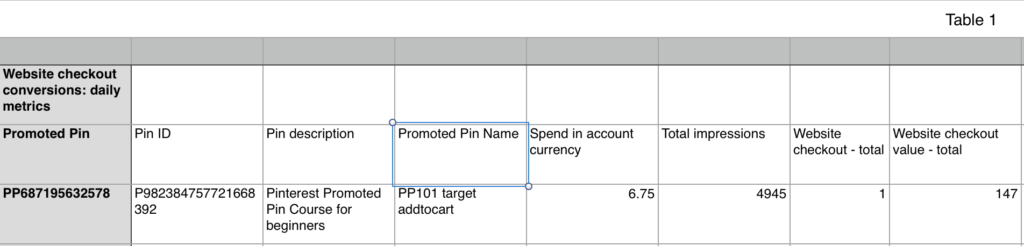

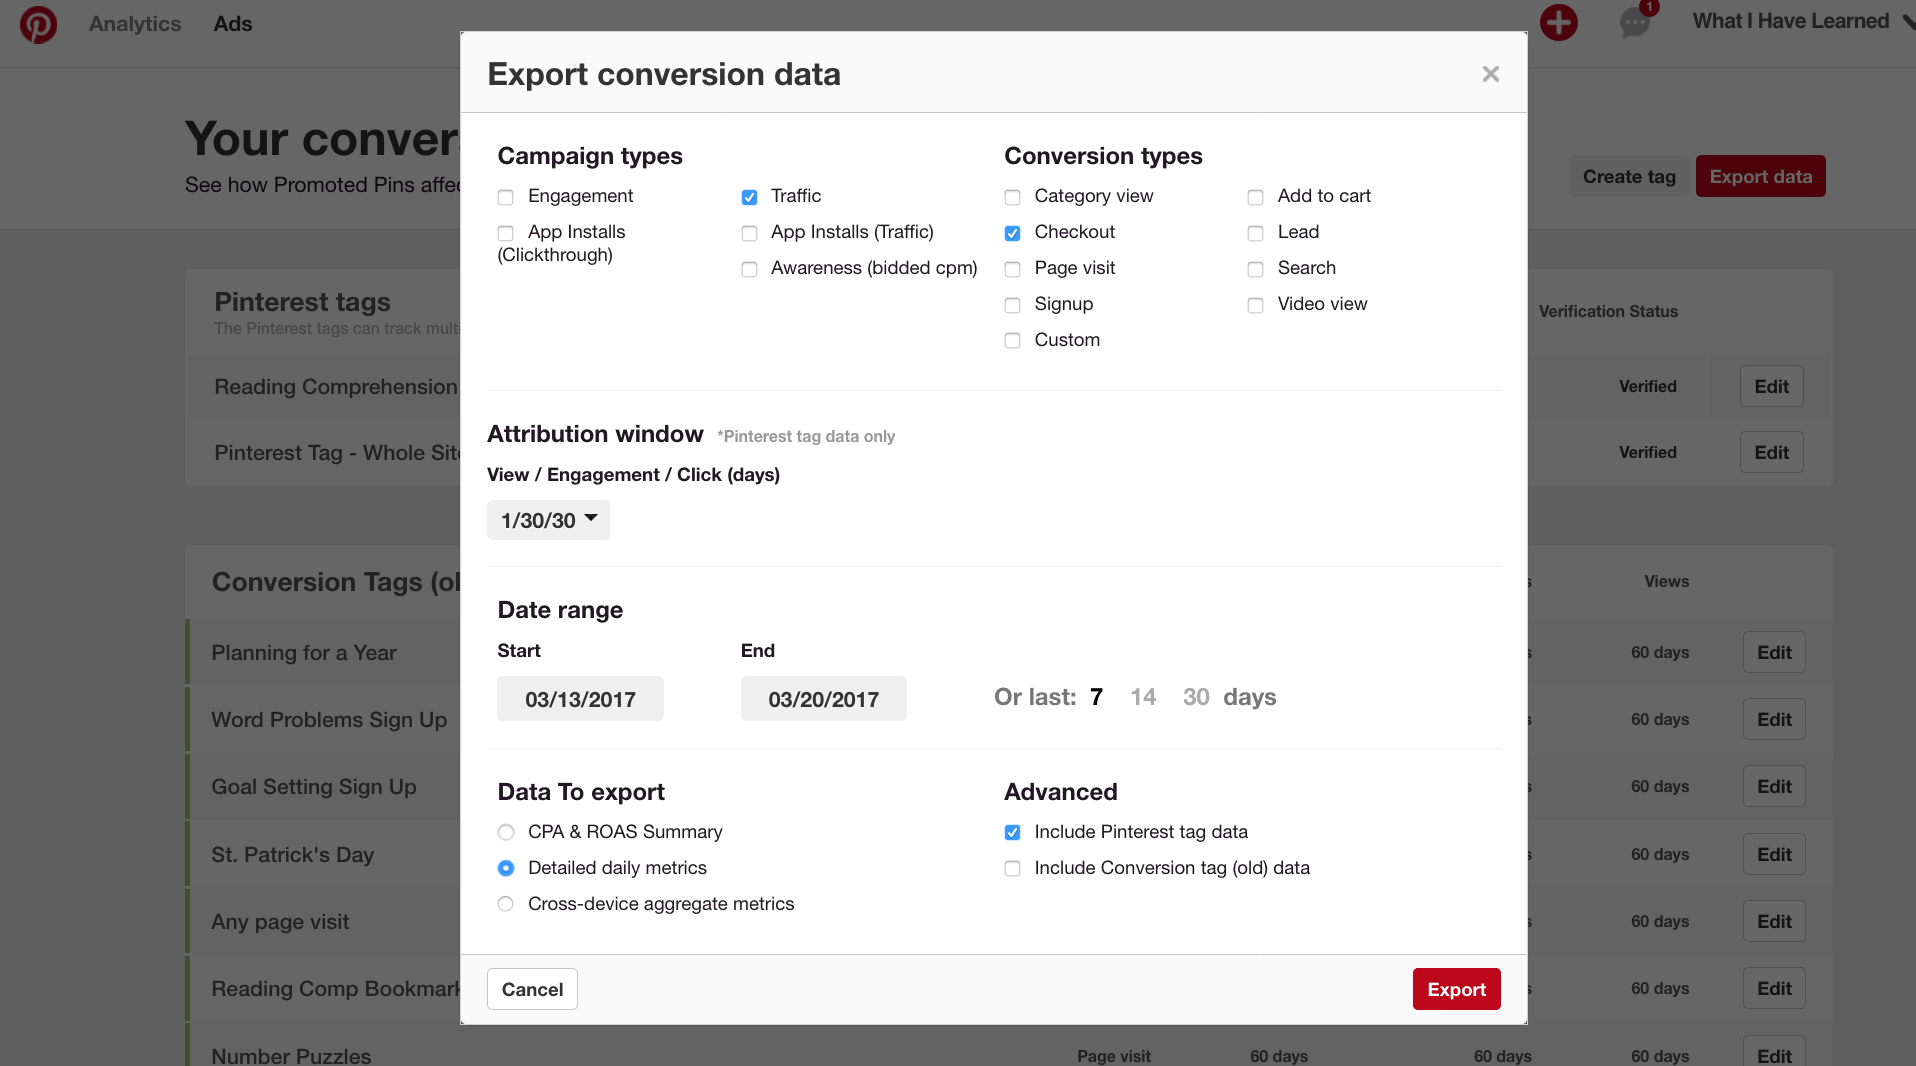
If you want to see other events, like Add to Cart or Lead, in the same export, be aware that Pinterest will export multiple tables of data, but drop them one on top of the other in one spreadsheet tab. You’ll have to look for a blank row followed by a new header row to find what you want. Better to export each one separately and then assemble them as desired!Thanks for sticking with me through this deep article. I hope it helps you create killer audiences and track your Pinterest Promoted Pin ROI to the penny! If you’d like help setting this up and establishing a process for evaluating results, I can help!
*Below are your “subrule” options: Custom Pinoculars attributes for AddtoCart and Checkout:


- product_ids – corresponds to product_id
- product_names – corresponds to product name
- value – same as value 🙂
- order_quantity – order_quantity
- currency (currently only available with Shopify)
Custom Pinoculars attributes for Search:
- search_query
Custom Pinoculars attributes for Leads (WordPress only):
- lead type (works with UTM campaigns)
So, what do you think? Will being able to create audiences and track results be a game changer for your Promoted Pins?
Related Posts


Latest posts by Alisa Meredith (see all)
- How Much Do Pinterest Ads Cost? - December 10, 2021
- Surround Sound Marketing – The Content Strategy of the Future - November 29, 2021
- How to Build Your Business with Word-of-Mouth Marketing - November 18, 2021