


Pinterest rich pins are about to get a lot more airtime. Why? Because Pinterest is changing the way it displays the description of pins that are repinned. Specifically, this will be happening:
“We’re no longer requiring that you add a note when you Pin, and we’re only showing you the note on a Pin if it was specifically added by it’s Pinner. We hope this is more useful than assuming everyone wants to keep the previous Pinner’s way of describing a Pin.
We added universal descriptions, created automatically from a variety of sources, to make sure Pins without personal notes have some useful information on them. We’re continuing to refine these to make sure they’re the best descriptions available.”

While I’ve yet to see this in the wild, there is one thing Pinterest pros agree upon as to the implication of this change. We simply MUST have rich pins enabled for our content. Otherwise, you leave it up to Pinterest to create a “universal” description for your pin. Whether or not this will continue to pin from your alternate text tag or not is yet to be seen.
Rich pins allow you control over an unchangable part of your pin and show your business icon, your name, the title of the article and your set description. For recipe, item, and other rich pins, you’ll see other data.
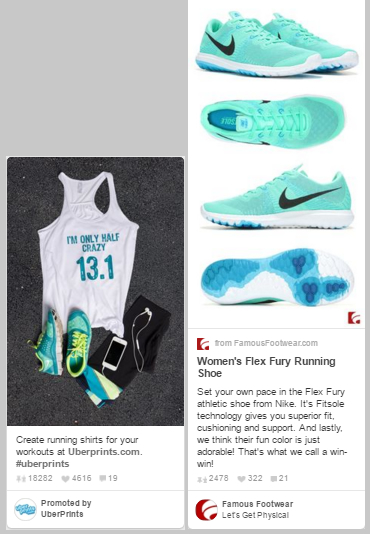
This helps your pins stand out in the feed and means that even if someone changed your description to “abc123” when they repin it, your original data will remain and cannot be modified by other pinners. It also gives you a bit of extra branding you wouldn’t get otherwise. Compare these two pins side by side, one rich pin, one not.
How to Enable WordPress Rich Pins on WordPress
There are instructions on the Pinterest site for this, but if you’re like me, talk about open graph and schema may cause your eyes to cross. Luckily there is a much easier way!
Step One: Install the Yoast SEO plugin – if you don’t already have it.
- In your WordPress dashboard, click on the “SEO” menu item in the sidebar.
- Now click on “Social.”
- Click on the Facebook tab and check the “Add open graph meta data” box.
- Add a Facebook Admin by clicking on the red button.
- Add a title and description for your home page.
- Set default value for an image if desired.
- Click “Save Changes.”
Step Two: Tell Pinterest You Want Rich Pins
- Apply for Pinterest rich pins here.
- Enter the URL of a page or post with rich pin data (any one should work now that you’ve completed step one).
- When you get a “Your Pin’s been validated!” message, click on the “Apply now.” link.
- Enter your domain name and choose “HTML tags” for your data format.
- Click “Apply Now.”
Step Three: There is no step three.
Pinterest may tell you they’ll contact you when they’ve reviewed your application, bu that may or may not be true. Check your pins from time to time to see when rich pins goes live for you!
Pin Me:

Related Articles:
- How to Add Rich Pins for Articles to Your WordPress Blog (mcngmarketing.com)
- Getting Pinterest Rich Pins (Yoast.com)
- How Pinterest is About to Change the Way We Shop

Related Posts


Latest posts by Alisa Meredith (see all)
- How Much Do Pinterest Ads Cost? - December 10, 2021
- Surround Sound Marketing – The Content Strategy of the Future - November 29, 2021
- How to Build Your Business with Word-of-Mouth Marketing - November 18, 2021