


With the proliferation of free tools like Mailchimp, there is really no reason you shouldn’t be collecting email addresses from the moment you set up your website. But, if you’re brand new, or not sure how to create email campaigns that drive sales, you can still make good use of Pinterest ads.
Yes, brand new businesses absolutely can find success with Promoted Pins ESPECIALLY because a full 70% of sales from Promoted Pins come from brand new customers. [clickToTweet tweet=”70% of Promoted Pin sales come from new customers – it’s great for new businesses! #pinterest” quote=”(click to tweet)”]
If this sounds like a good plan to you, please read the entire formula below before you get started and trust me when I tell you it’s not difficult, but getting from Pin to sale is going to take a little time. That’s pretty much always the case with Pinterest – but the payoff is the long-term gains from the time you put in. Totally worth it.
First things first though – make sure you have a way to track sales on your Promoted Pins. Got it? OK, let’s go!
Creating Your Sales Funnel with Pinterest Promoted Pins
Step I – Build an Audience
If you don’t have a huge audience to target with Pinterest advertising (Pinterest considers a list under 100K Pinners to be “small”), you’re going to need to target strangers. No problem! You can use keyword and interest targeting to get your pin out to people who don’t know you yet. Further, you can use Actalike audiences to build off any audiences you do have.
Let’s assume that we are starting from absolute zero. So, we’re going to:
- Create a basic, useful blog post (just one – you can do it!)
- Create 3 images to promote that blog post
- Promote those images using keyword targeting
Let’s assume you sell t-shirts. In this case, we’re going to create a blog post called, “The 5 Most Iconic T-Shirts of All Time.” It’s fun, it’s not about selling, and you can make fun images for it! Oh, and make sure it is easy for people to get from the blog post to your store. It sounds obvious, but you don’t want to make it hard for them to buy now if they really want to!
Speaking of images, make yours 735x1102px (Use Canva!) and use some fun text overlay. Add a little bit of subtle branding (a small logo or URL).
For keywords you might use words such as: t-shirts, ladies t-shirts, men’s t-shirts, tees, gifts for grads, novelty tees, etc. Keep going until you get to at LEAST 30. Get more simple tips for finding keywords that work.
Step II – Build off the Engagement on your First Promoted Pin
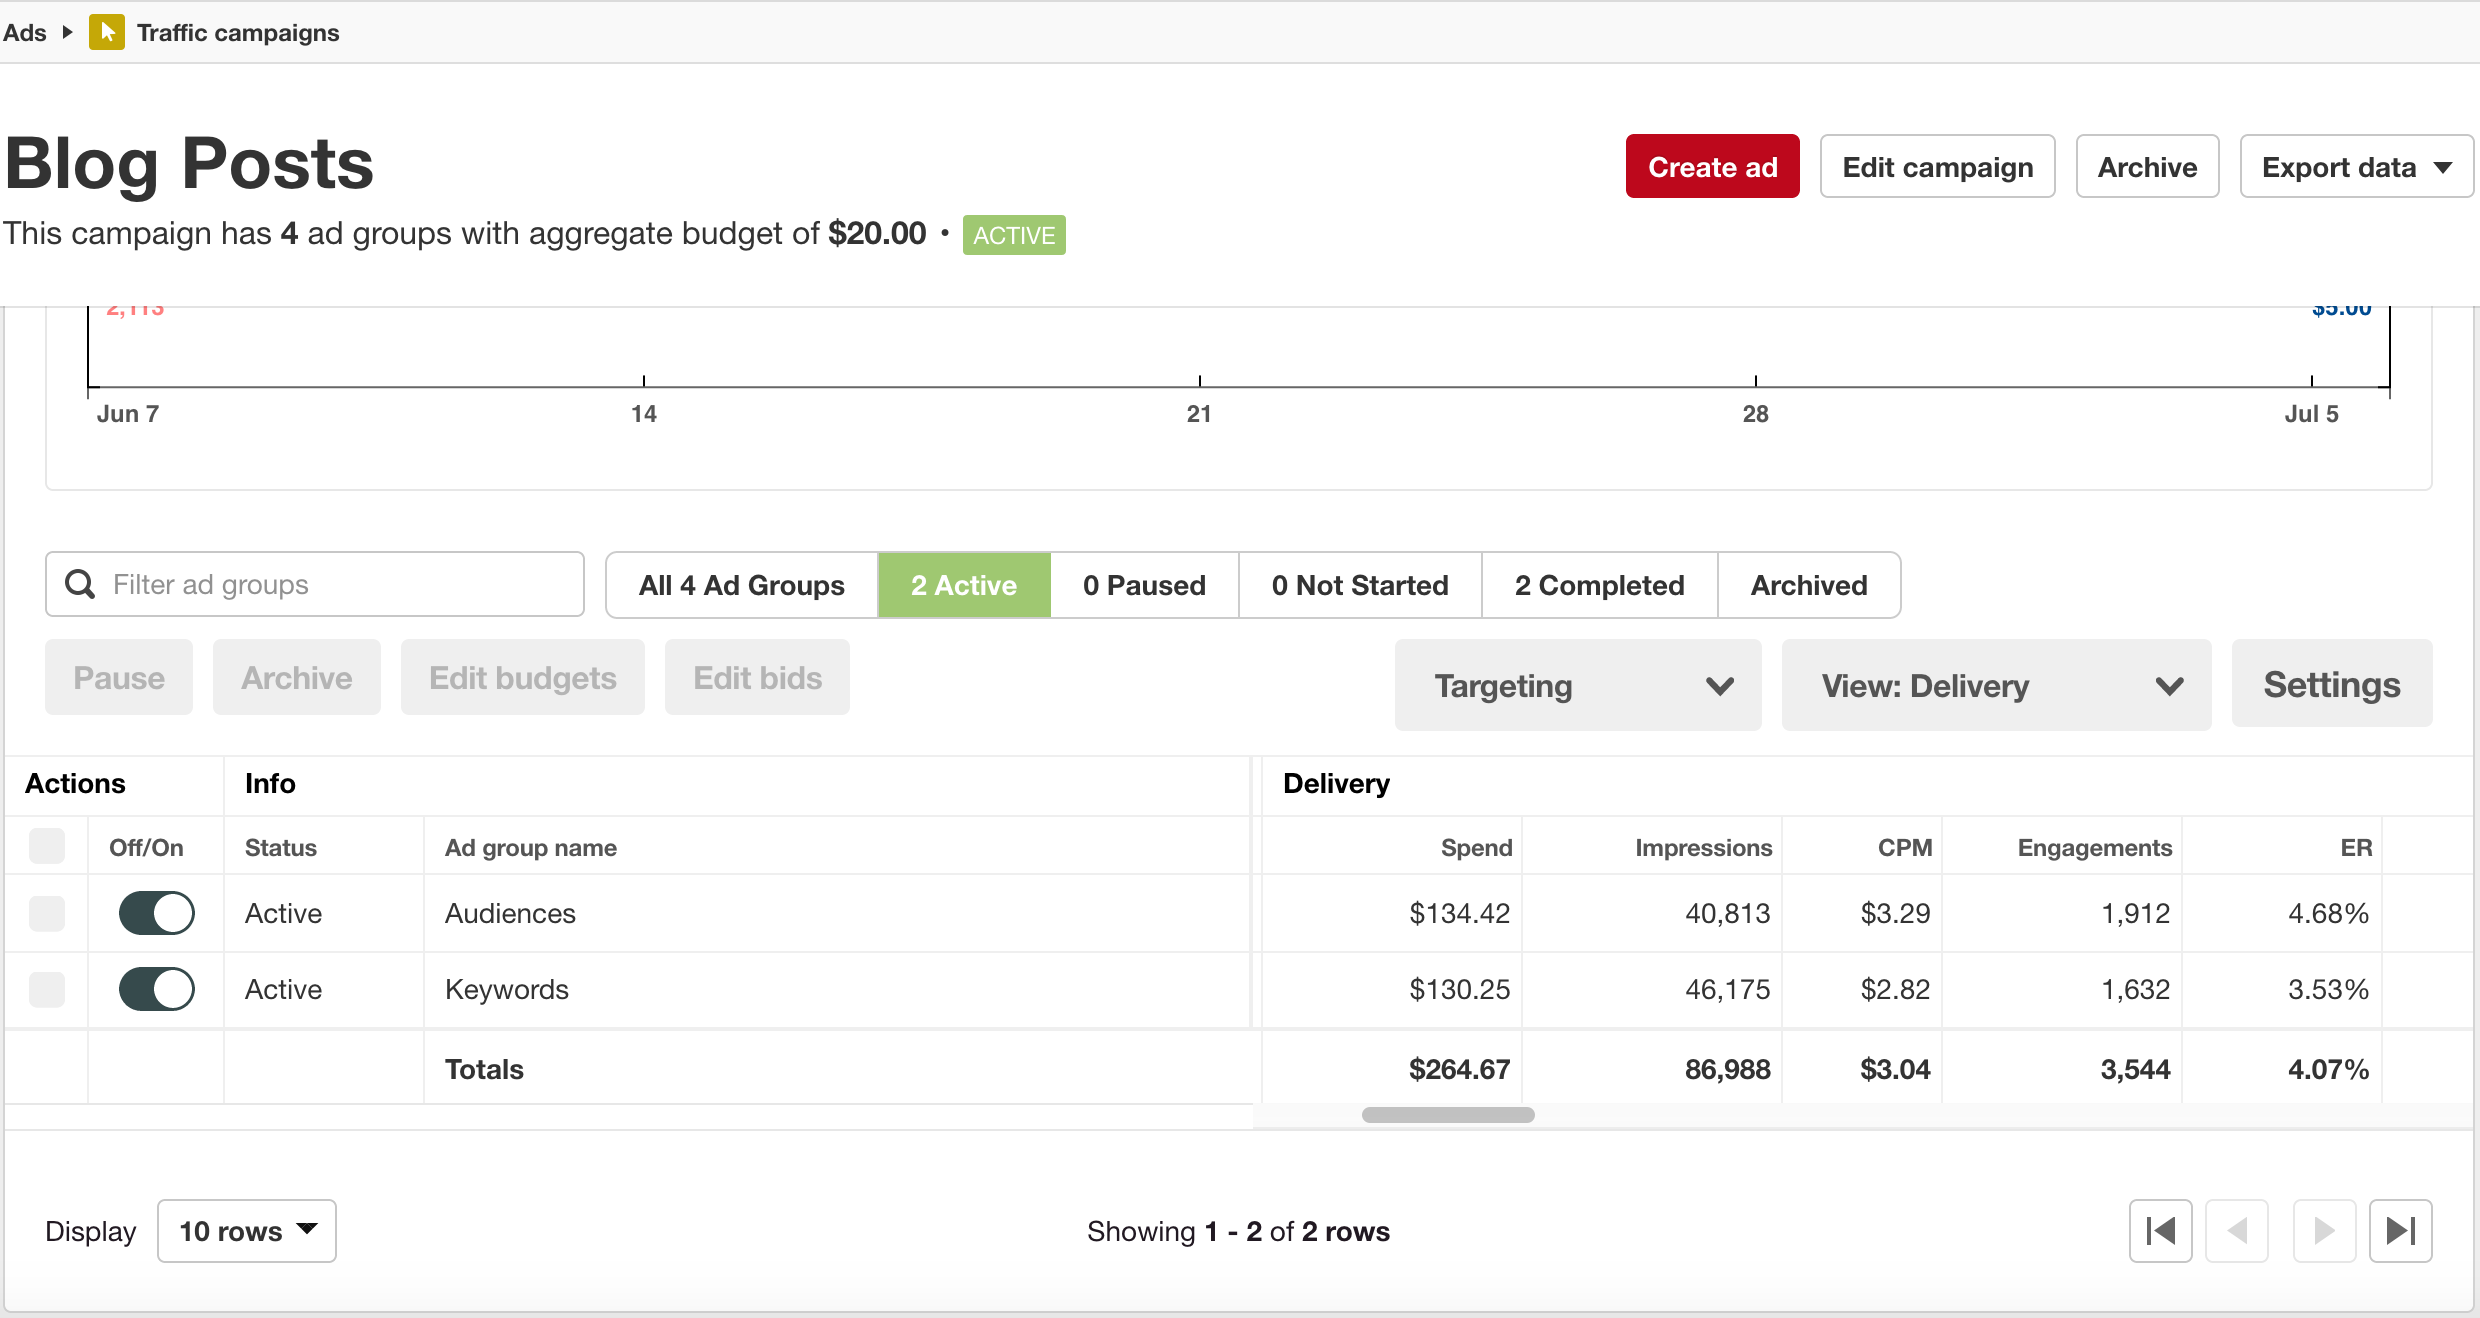
Let your pins run for a while. The length of time you’ll need to wait depends on how many impressions and engagements you’re getting. As a benchmark, let’s wait until you have 2,500 engagements on your Promoted Pin. To find out if you’ve hit that mark, go to Ads > Traffic Campaigns > Blog posts and look at the Delivery view, as shown below.
Please note that this can take weeks or months to reach, depending on your budget, but the more engagements you have to work with for this step, the better!

What we’re going to do next is send those people who engaged with the Pin you Promoted in step I back to your website with another Promoted Pin. So:
- Create another blog post along the same lines as the first one. Maybe, “How to Style a Tee Shirt.”
- Create 3 images (lifestyle images work best) to promote the post.
- Promote those images only to people who engaged with the Pins you Promoted in Step I. If at this point you have a list of people who have already purchased from you, you may wish to upload that as a customer audience and exclude those people from this and subsequent steps. Your call!
How do you create an engagement audience? It’s easy? You’ll create an engagement audience with a filter using the URL from the FIRST blog post. In effect you’re saying – anyone who engaged with that first Promoted Pin campaign should see this one, too. Let’s go for a pretty large window – say 90 days (see below).
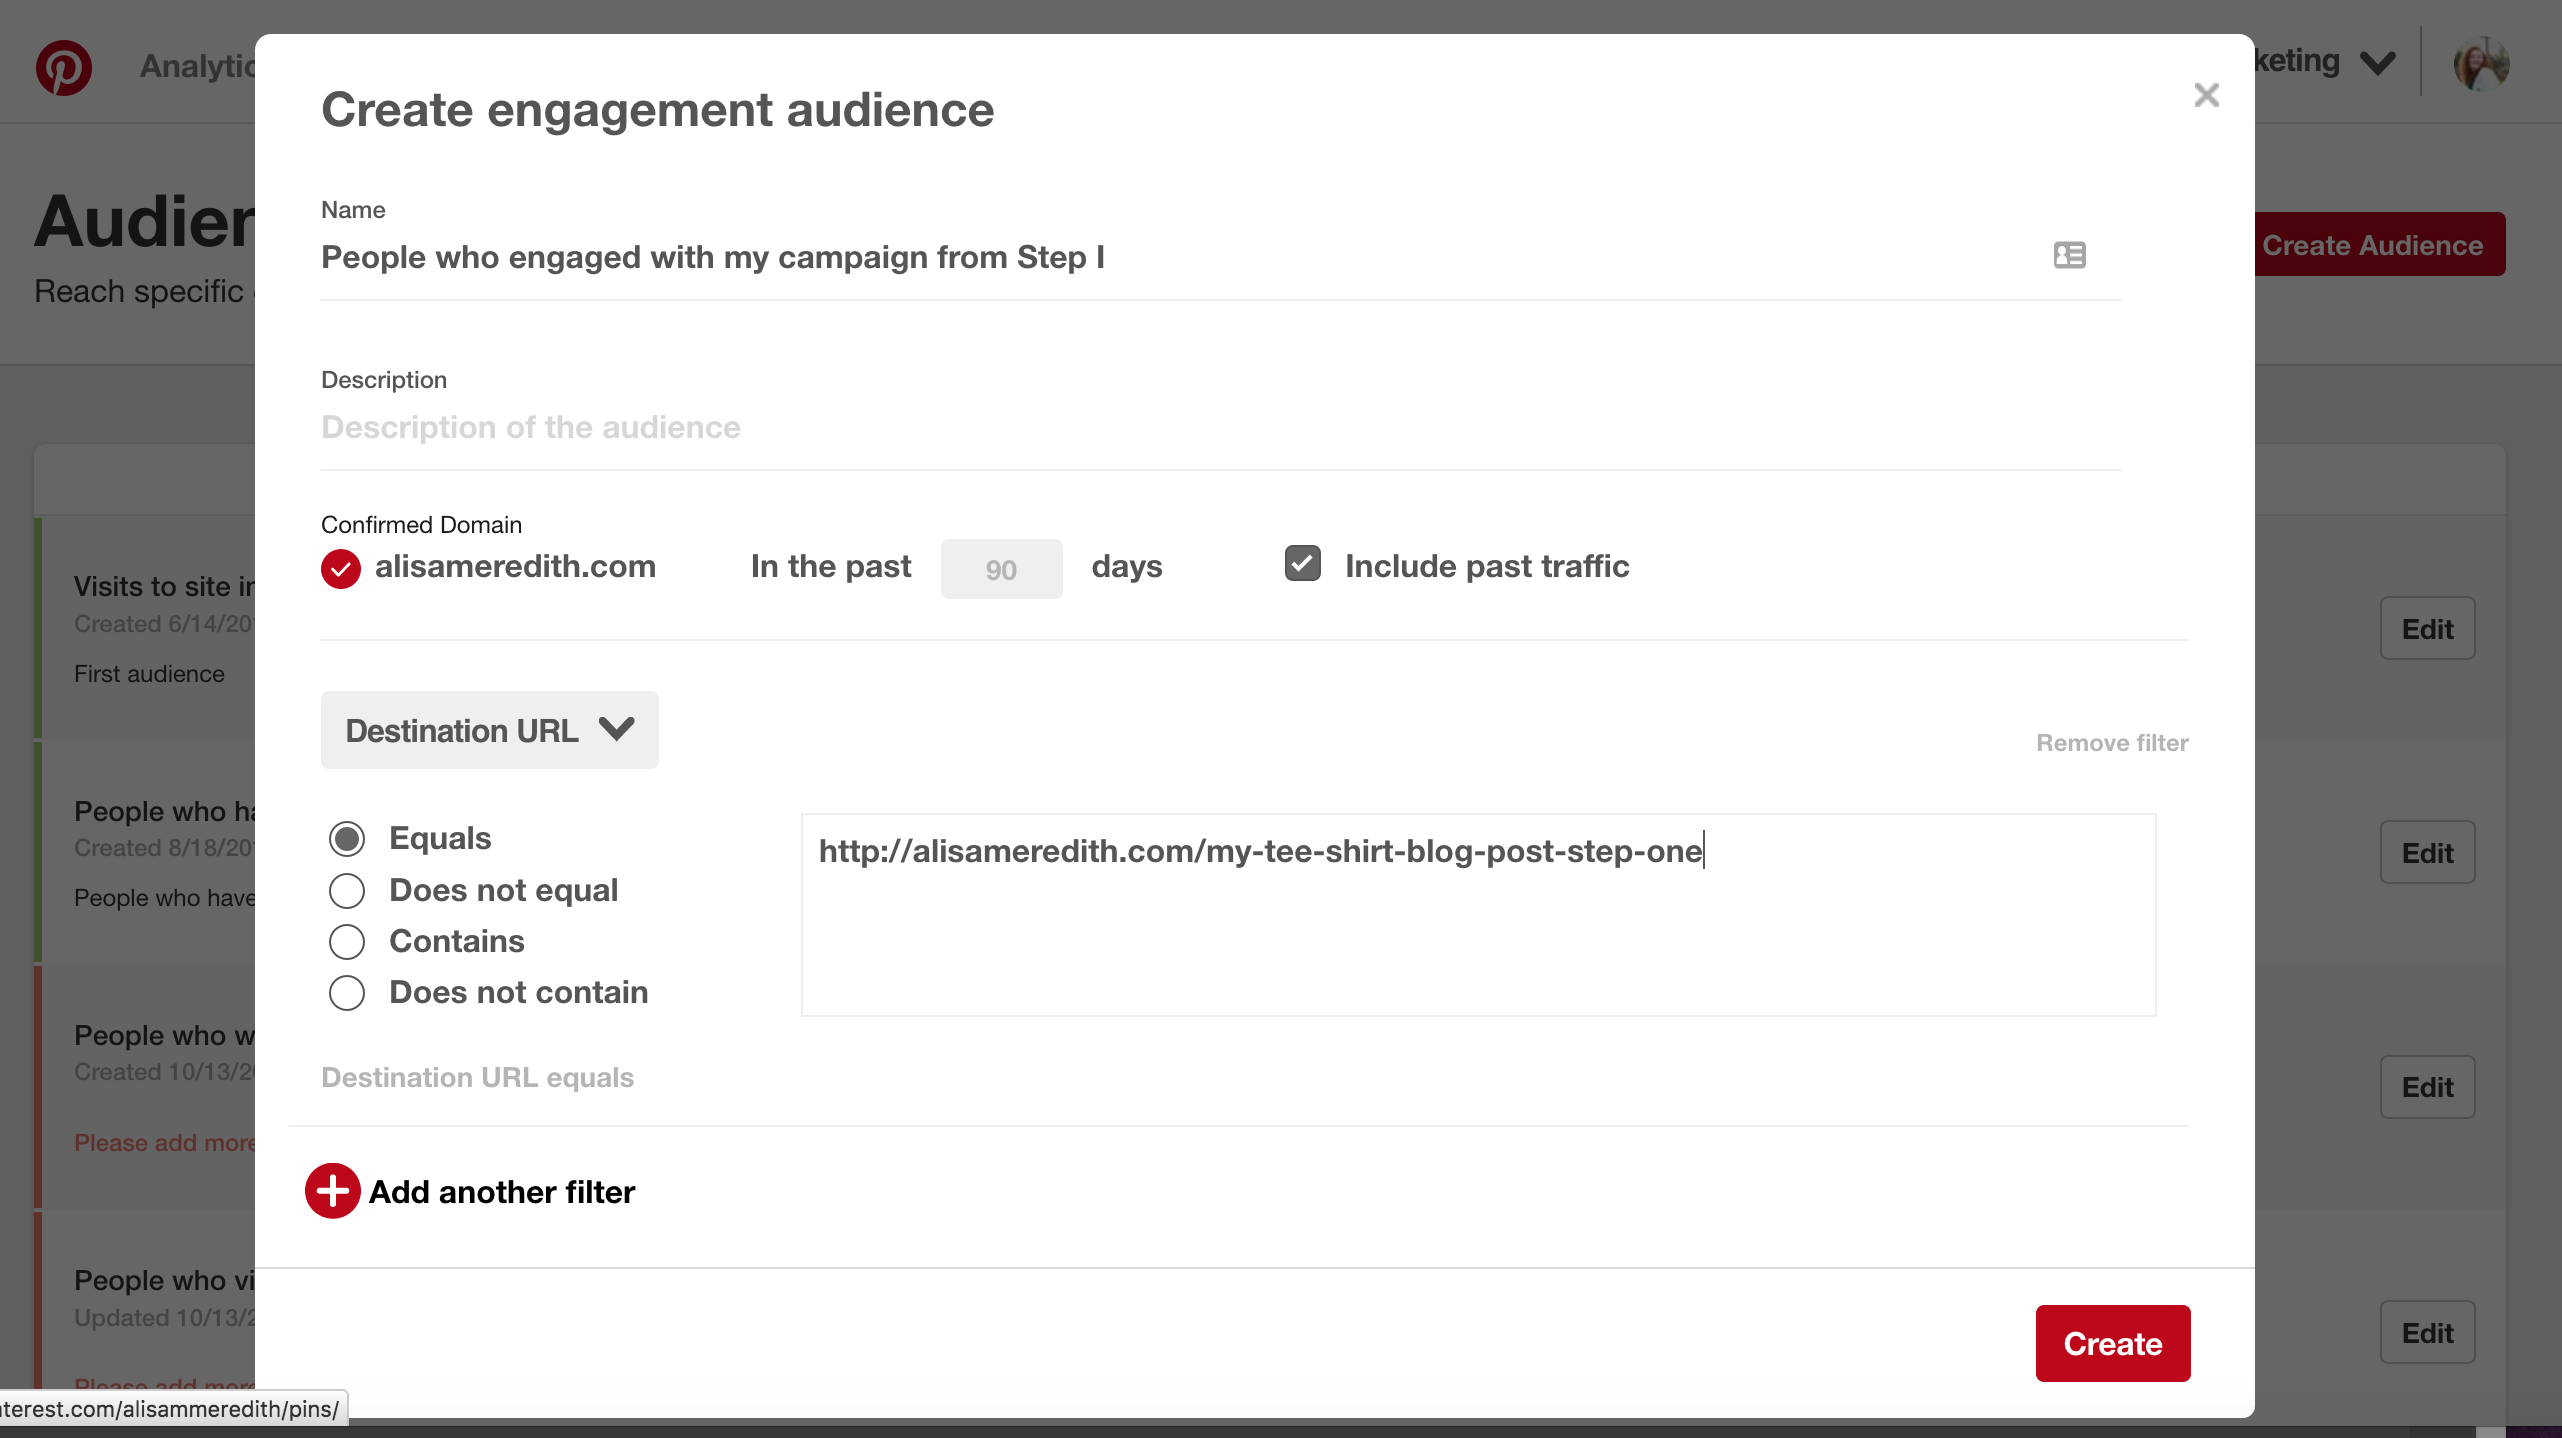

A note about targeting engagement: When you target all engagements, you’ll reach people who clicked, commented, saved, or did a closeup on your pin – all indicate different levels of interest.
Set up the Promotion and target your audience. Sit back and let it run. 🙂
Step III – The Sale
You could go in for the sale right from step one. You could also create more steps between II and III, but for our purposes we’re going to say that you now have warmed up your audience nicely and are ready to give them a chance to buy from you.
- Create Pins for your most popular items (preferably those featured in the above blog posts).
- Create and Pin lifestyle and product images, as well as collage-style combinations of both types.
- Promote these Pins to People who engaged with BOTH the prior Promoted Pin campaigns.
Note: You might consider enabling “One Tap” on this campaign since this is an audience who knows you and your site already. Just watch out that you don’t blow through your budget too quickly – and make sure you have tracking in place so you know what’s working (or not). I know I said that already, but maybe you skipped that step. Don’t. 🙂
At this point we’re going to create a new engagement audience for the first AND second blog posts you created and Promoted. It will look just like the one we did in Step II, except we are going to add another filter. So set up an new but identical engagement audience, then click on the “Add another filter” button and set it to Destination URL Equals and enter the second blog post’s URL. Now rename it “People Who Engaged with My Pins from Step I and II” (or whatever makes sense for you).
Now, you can use this audience to retarget only people who engaged with both the first AND second Pins you promoted, meaning, they likely have a high level of interest.
Please note that, depending on your budget and the level of engagement on your Pins, it may take a while to generate a large enough audience to make your funnel successful and scalable.
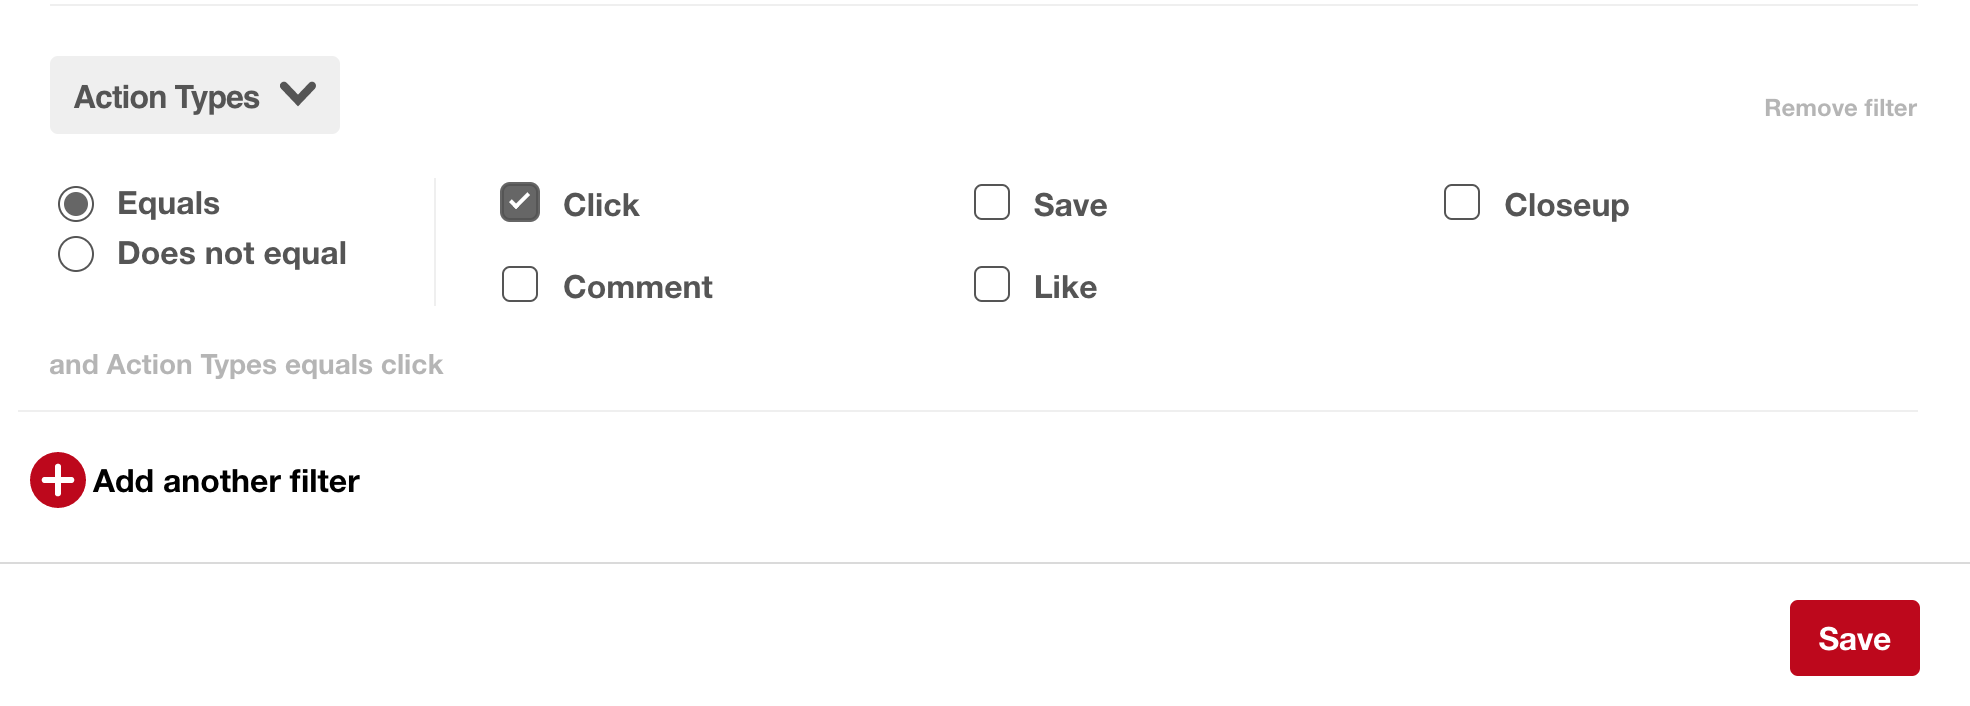
On the other hand, you may end up with a HUGE audience – yippeee! You can whittle it down a bit to make it even more likely that those Pinners who see the Promoted Pin will convert by limiting your engagement audiences only to people who actually CLICKED on your pin. To do this, go back to your “People Who Engaged With My Pins from Step I and II” audience and add another filter like this:

While ultimately you want to have these interested people added to your email list so you can continue to communicate with them, this is absolutely an option for someone just starting out.
What do you think – could this work for you?

Save
Save
Save
Save
Save
Save
Save
Save
Related Posts


Latest posts by Alisa Meredith (see all)
- How Much Do Pinterest Ads Cost? - December 10, 2021
- Surround Sound Marketing – The Content Strategy of the Future - November 29, 2021
- How to Build Your Business with Word-of-Mouth Marketing - November 18, 2021